Developer Guide
Table of Contents
Introduction
Background
Purpose
Scope
Design Goals
Maintainability
Definitions
Setting up the project in your computer
Design
Technological view
Architecture
Writing Manager Component
Bunny Manager Component
Saving bunnies via the program commands
Loading bunnies directly into the bunny.txt file
Usage and storage
Word Manager Component
Name Manager Component
Implementation
User interaction overview
Writing Features
Constitution (member classes)
Getting reminder for writings scheduled on a specific date
Word Features
Adding a noun
Adding a verb
Adding an adjective
Listing words
Generating three random words
Filtering words
Bunny class family overivew
BunnyList, BunnyFilter, and DeleteBunny class overview
BunnySaver and BunnyLoader class overview
GenBunny class overview
Bunny command implementations
Adding bunny idea bunny
Listing bunny ideas list bunny
Filtering bunny ideas: filter bunny
Saving bunny ideas: save bunny
Deleting a bunny idea: delete bunny
Generating a random bunny idea: random bunny
Resetting the entire list of Bunny ideas: reset bunny
Names class family
Overview of main function
Names Storage
Names Exception Handling
Names method implementation
getName method
filterNames method
listNames method
addName method
deleteName method
ClearLoader class
Aesthetic components
Changing line divider in Fluffle: divider
Testing
Using JUnit test
Using Gradle
Appendices
Appendix A: Product scope
Target user profile
Appendix B: Value proposition
Appendix C: User Stories
Appendix D: Non-Functional Requirements
Appendix E: Instructions for manual testing
Launch and Shutdown
Introduction
Background
Fluffle is a desktop app for creative writers, optimized for use via a Command Line Interface (CLI). It aids users in creating and managing their writings and ideas. As a fast-typing writer, this CLI app is highly suitable for you.
Purpose
This document specified architecture and software design decisions for the creative writing assistant, Fluffle.
Scope
This describes the software architecture and software design decisions for the implementation of Fluffle. The intended audience of this document is the developers, designers, and software testers of Fluffle.
Design Goals
Our goal is to create an app which improves users’ ability of writing and creativity. Developers should work closely with CS2113T’s module instructors, who represent technical advisors and CS2101’s module instructors, who represent non-technical advisors. By adhering to these tutors’ specific requirements, which imitate industrial professional standards, beginner software engineers will be able to levitate their expertises and mindset in the process of developing and presenting a new product.
Maintainability
With the aim of increasing maintainability of Fluffle, separated packages and classes were implemented in strict compliance with Object-oriented Programming. Since it is important to be able to easily change functionality of one class without disturbing other dependent classes, each class only serves one purpose to reduce dependency on other classes. With low coupling and high cohesion, subsequent developers can make minimal effort in maintaining Fluffle.
Definitions
| Terminology | Explanation |
|---|---|
| Plot bunny | A story idea that refuses to go away until it is written down. |
| Fluffle | A fluffle is a group of bunnies. |
| CLI | Command-line Interface. </br></br>A command-line interface (CLI) processes command to a computer program in the form of lines of text. The program in the computer will read the command and start proceeding. |
| Gradle | A build tool used for automated testing. It checks for code style violations and runs unit tests to ensure the code is functional between iterations. |
| IntelliJ | An integrated development environment that used to write and test java code. |
Setting up the project in your computer
Prerequisites:
- JDK 11
- IntelliJ IDE
First, fork this repo, and clone the fork into your computer.
If you plan to use Intellij IDEA (highly recommended):
- Configure the JDK: Follow the guide [se-edu/guides] IDEA: Configuring the JDK to to ensure Intellij is configured to use JDK 11.
- Import the project as a Gradle project: Follow the guide [se-edu/guides] IDEA: Importing a Gradle project to import the project into IntelliJ IDEA.
:exclamation: Note: Importing a Gradle project is slightly different from importing a normal Java project. - Verify the setup:
- In IntelliJ IDEA, choose to run
Duke.main(). Gradle will need some time to build the project at first. - If your setup is correct, you should see something like below:
--------------------------------------------------------------
Write a story with
  ______ _        __  __ _
 |  ____| |      / _|/ _| |
 | |__  | |_   _| |_| |_| | ___
 |  __| | | | | |  _|  _| |/ _ \
 | |    | | |_| | | | | | |  __/
 |_|    |_|\__,_|_| |_| |_|\___|
--------------------------------------------------------------
Hello User! Welcome to Fluffle!
What can I do for you?
--------------------------------------------------------------
What is your name?
- In IntelliJ IDEA, choose to run
Design
The following sections describe the high-level overview of our application, Fluffle.
Technological overview
The Integrated Development Environment, IntelliJ, is used to develop our program. The program is written in Java, and uses Gradle for building and testing purposes. Our source code is mostly original, with some functions imported from the java.util package. The remaining packages and classes which form the structure of our program are independently developed.
Project overview
Fluffle is built using IntelliJ and all concepts for the user interfaces, as well as the backend data management of the application, was created by our team. Due to the restrictions of the project, the main file format used for storage is .txt. We opted to save the data in the text files in a user readable format as opposed to the comma separated format as it is easier for users to directly refer to and edit their saved files.
Architecture
The following figure describes the overall architecture of Fluffle.
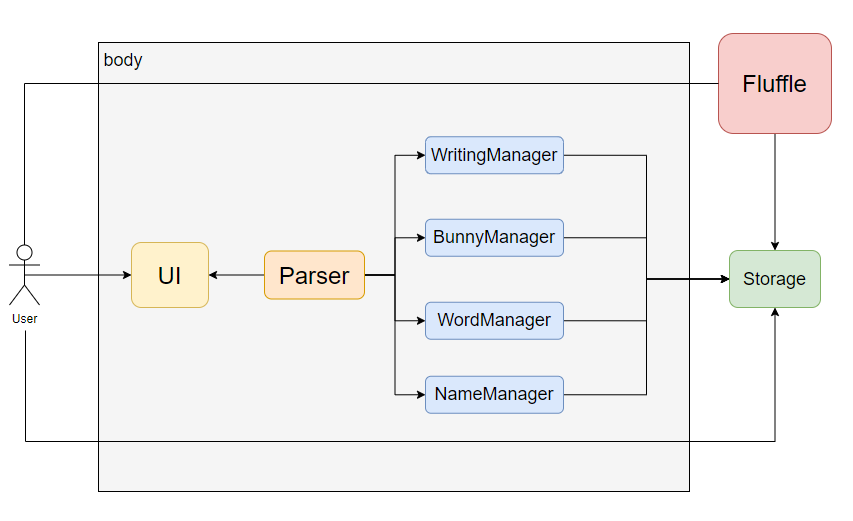
Figure 1: Overview of Fluffle Architecture
The design of Fluffle contains four main components:
- Writing Manager component
- Bunny Manager component
- Word Manager component
- Name Manager component
All components can be accessed by the user through Fluffle’s UI. On loading Fluffle, all components will be loaded from the storage. On exiting Fluffle, all components will be saved to the storage.
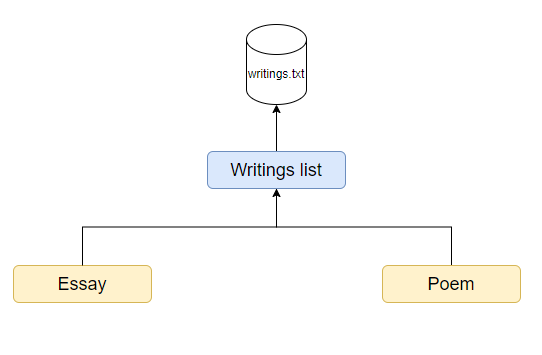
Writing Manager Component
Given below is the overall architecture of Fluffle’s writing component.
 </img>
Figure 2: Writing manager architecture
In Fluffle, the writings are saved in the local hard drive text file writings.txt. Up to now, Fluffle can hold two types of writing: Poem and Essay. Some operations that can be done on the writings are:
- Adding writings to the database.
- Deleting writings from the database.
- Getting a reminder to continue some writings on a specific date.
Bunny Manager Component
There are two methods for the user to load their bunny ideas into the application: loading it using the app or directly editing the bunny.txt data file.
Saving bunnies via the program commands
The bunny ideas can be loaded into Fluffle by the user using the bunny command. This command automatically adds these Bunny objects into the bunniesList ArrayList which can be found in the BunnyList class. the bunny command has separate arguments for the idea and genre so the user can easily key in the two components.
Loading bunnies directly into the bunny.txt file
The user may directly edit the bunny.txt file, though they must be careful to edit it in the correct format similar to how the program works. Specifically for each Bunny, the program will first search for the line with the BUNNY_IDEA_TAG as specified in the Tags class and parses the idea component of the Bunny. It then searches for the line with the BUNNY_GENRE_TAG also specified in the Tags class and parses the genre component of the Bunny from there.
A sample view of what the user might find in the bunny.txt file is as follows:
number of plot bunnies: 2
--------------------------------------------------------------
1.
  idea: some fantasy related idea
  genre: fantasy
--------------------------------------------------------------
2.
  idea: some random idea
  genre: none
--------------------------------------------------------------
Since the program only searches for the idea and genre tag, it is lenient when reading in the bunny such that if the user keys in the wrong line divider or index it can still read it in. It can excuse spacing and typo as long as each Bunny is listed with an idea tag followed by its corresponding genre tag. This makes it easy for the user to directly edit the bunny.txt file if they wish. It will read the file until it can no longer has a next line in bunny.txt to read from.
Usage and storage
The diagram above is describes the storage of the Bunny ideas in Fluffle.
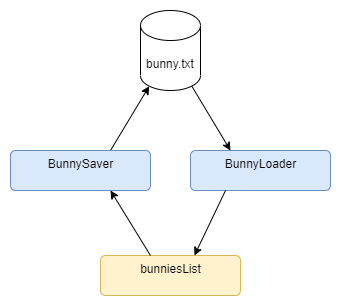
Figure 3: Bunny manager architecture
Transferring Bunny ideas from the bunniesList to the bunny.txt file via the BunnySaver:
- When the user calls the
save bunnycommand from the CLI, the Bunny from bunnies list are read bysaveAllBunnycommand. - The
bunniesListArrayList is passed by thecommandExecutorfunction in theCommandExecutorclass. - The
saveAllBunnycommand first prints the number ofBunnyobjects found in thebunnyListas follows:number of plot bunnies: 10 -------------------------------------------------------------- - The
BunnySaverclass formats the idea and genre into neatly tagged strings, numbered following their index in the ArrayList and seperated by plain line dividers as follows:1. idea: bunny idea 1 genre: none -------------------------------------------------------------- 2. idea: test idea 2 genre: none --------------------------------------------------------------
Transferring Bunny ideas from the bunny.txt to the bunniesList file via the BunnyLoader:
- The
BunnyLoaderclass handles the loading of savedBunnyobjects from thebunny.txtfile into thebunniesList. - The format of each
Bunnyobject should consist of an idea and genre component, even if the genre component is “none”. - For each of the
Bunnyobjects in the printed list inbunny.txt, the parsed idea and genre are combined to create aBunnyobject that is then added to thebunniesListArrayList and can be managed by the user using the bunny related commands.
Note that all the other functions in the bunny related classes such as BunnyList, DeleteBunny, BunnyFilter and GenBunny can also access this bunniesList ArrayList to perform their various functions as it is passed by reference from the commandExecutor function, which imports the bunniesList from the BunnyList class. Find out more here.
Word Manager Component
Given below is the general architecture of our Word Manager Component.
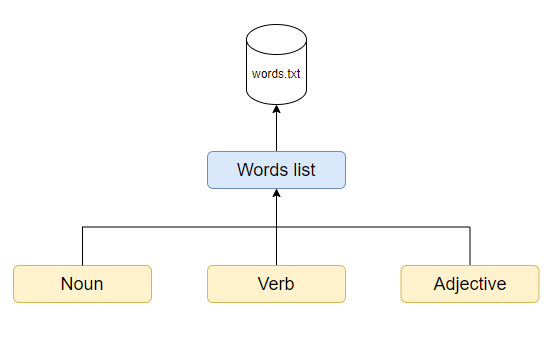
Figure 4: Word Manager Architecture
In Fluffle, the words list is stored in the local hard drive location data/words.txt.
Fluffle can hold three types of word: Noun, Verb and Adjective.
The operations that can be done on the words list are:
- Viewing the words list.
- Getting three random words.
- Filtering words (by word types or by substrings).
Name Manager Component
Given below is the overall architecture of Name Component.
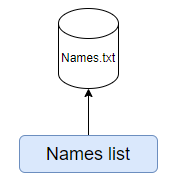
Figure 5: Name Manager Architecture
Fluffle can hold a list of names for your reference when writing. The names are stored in a text file named Names.txt. Some operations that can be done on names are:
- Adding a new name.
- Removing an exisiting name.
- Generating a random name.
Implementation
User interaction overview

After the initial logo printing and registration step, the main in the Duke class enters a while loop, which will only exit when the exit command is detected. This component handles the processing of various commands in Fluffle and makes it easier for developers to add new commands without interfering with implementation of other commands.
For simplicity when the CommandExecutor class is referenced in later UML diagrams in this document, you may assume that it is a continuation of the excecuteCommand section of this diagram.
Writing Features
Constitution (member classes)
WritingList: Represent the objects which are particular lists of Writings to be used in the application.
Writings: Represent the objects of the writings, created from user’s input and stored in a database as text.
This Writings class is also the parent of 2 subclasses which are Poem and Essay.
- Poem: Represents the Writings objects which have type is Poem.
- Essay: Represents the Writings objects which have type is Essay.
User: Represents the Users registered to the System
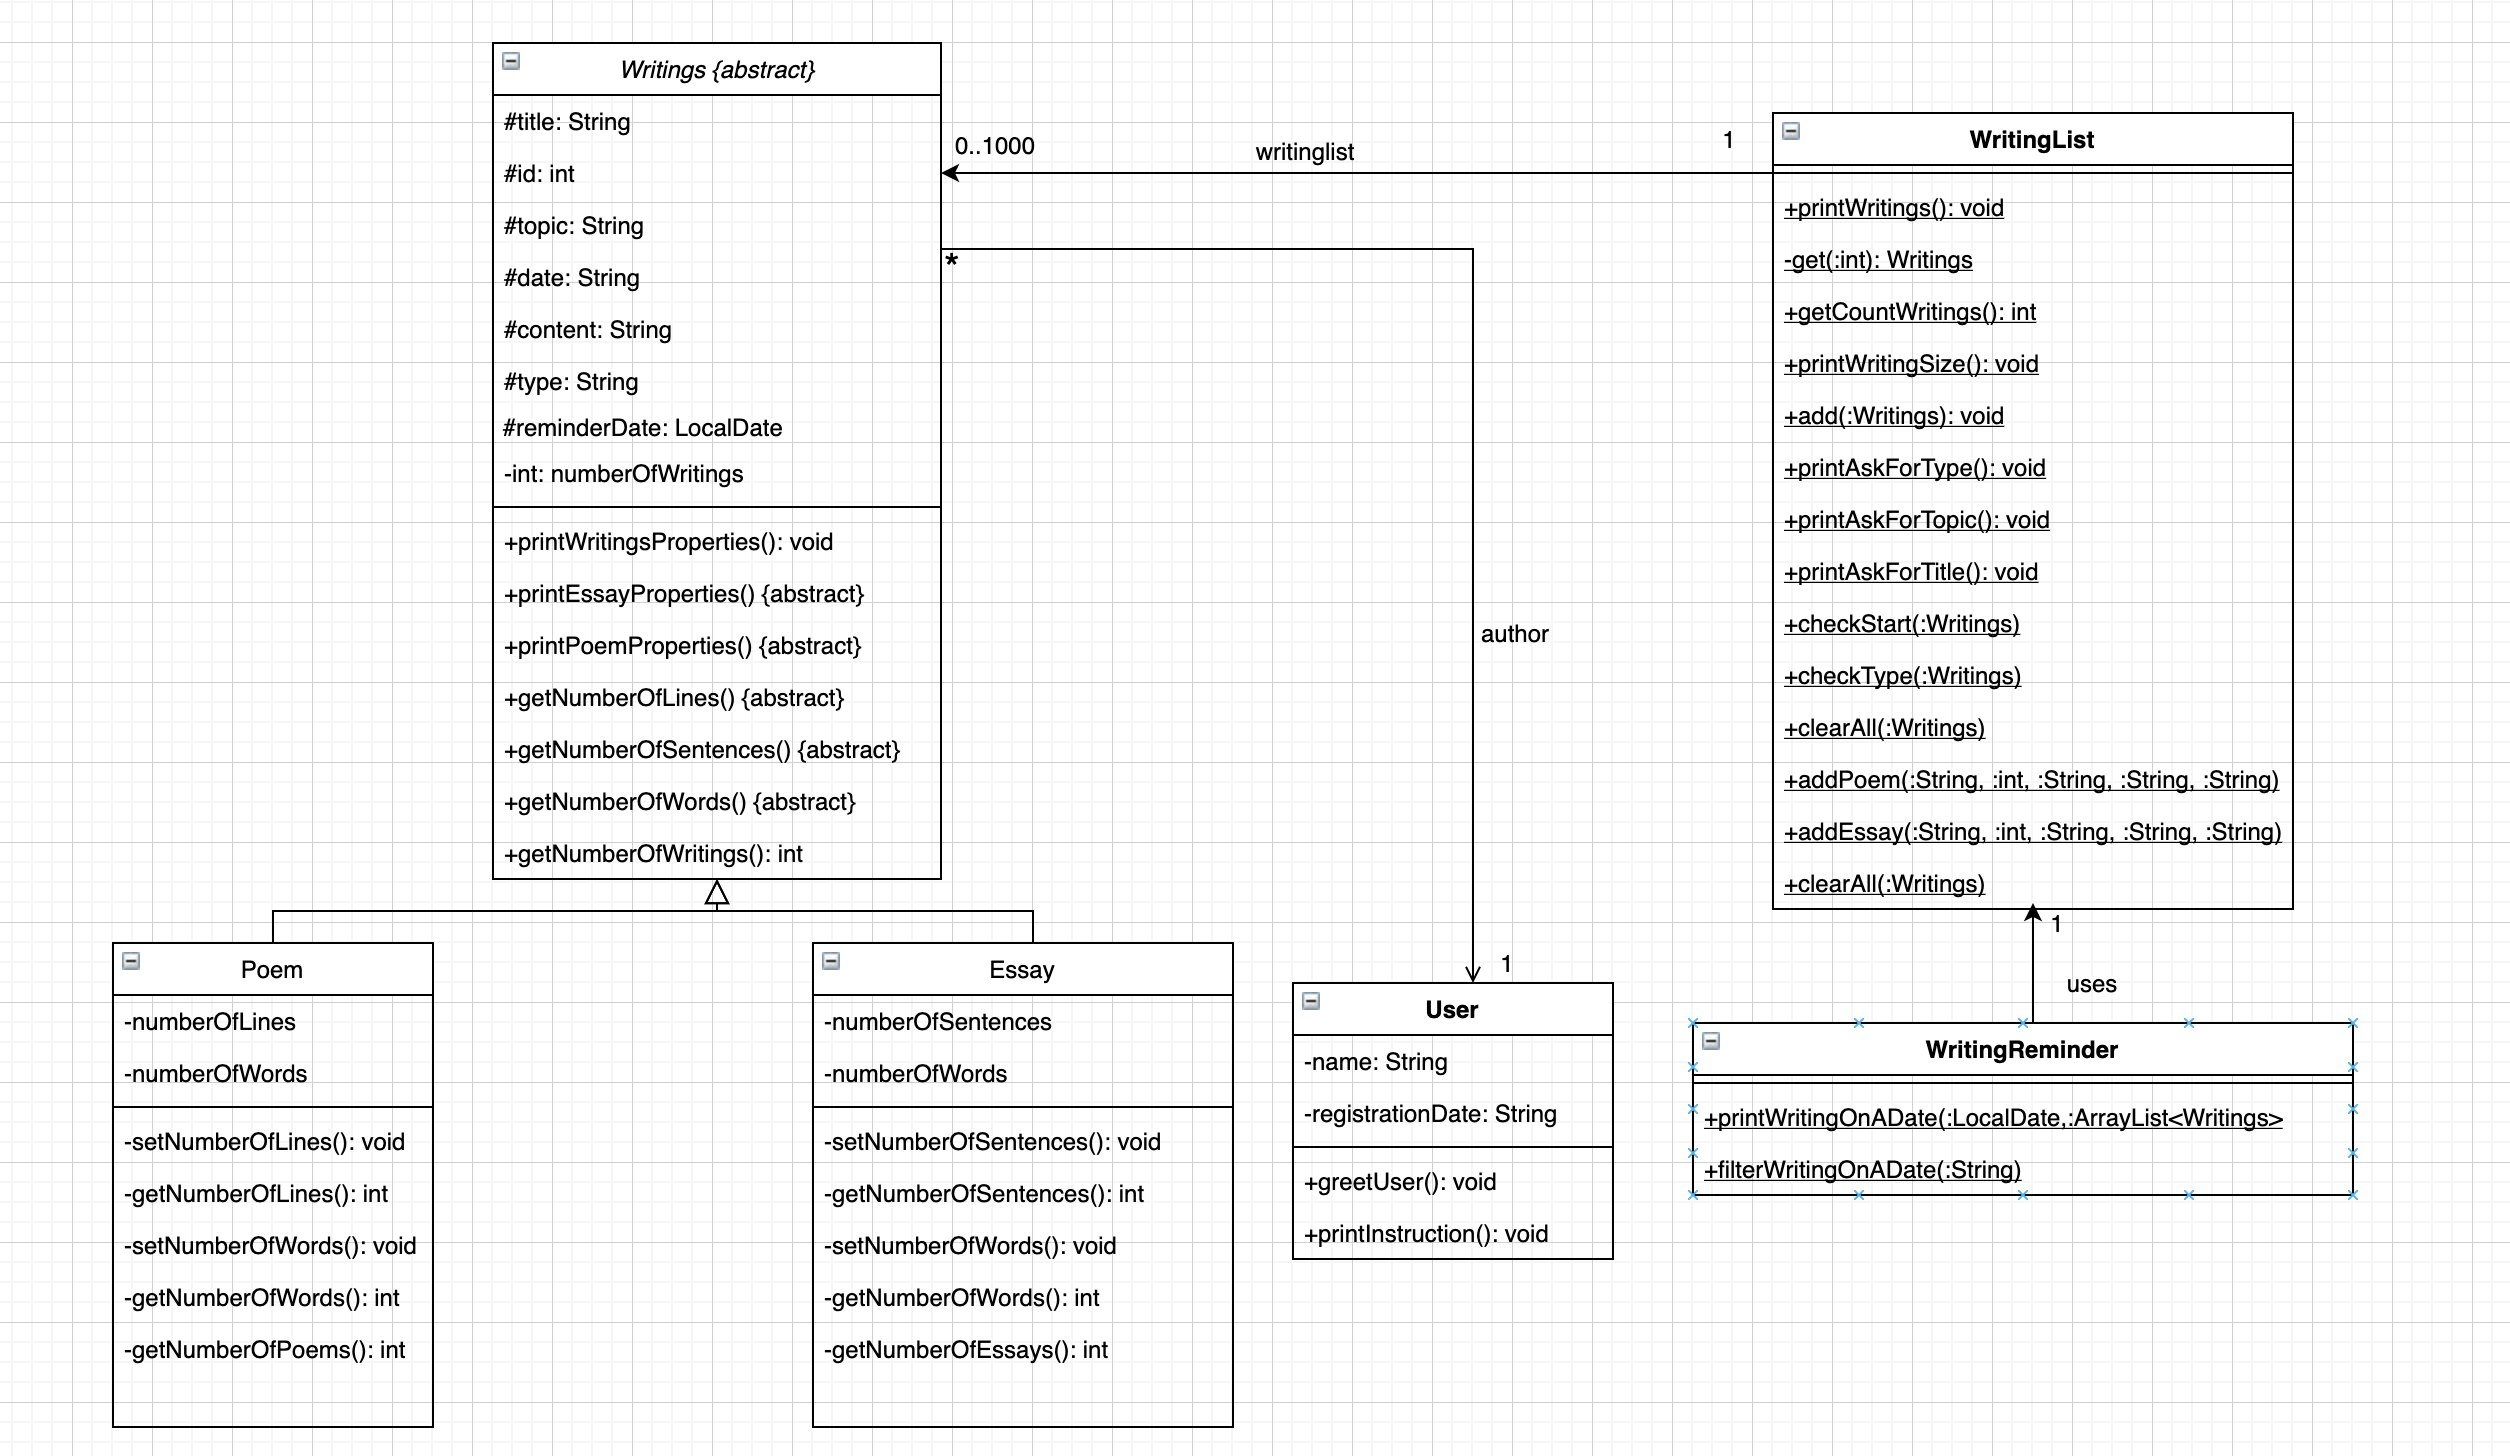
Figure 6: WritingList family UML diagram
The above class diagram describes the overall architecture of Writings class functionalities and associations within the scope of related classes. By checking “start”, “type” command with checkStartCommand() then checkTypeCommand() methods on that sequence respectively, the user should be able to access the process of creating and saving new writings into the database. During this process, the user has the ability of choosing their preferred type of writings(which are either poem or essay at this stage)
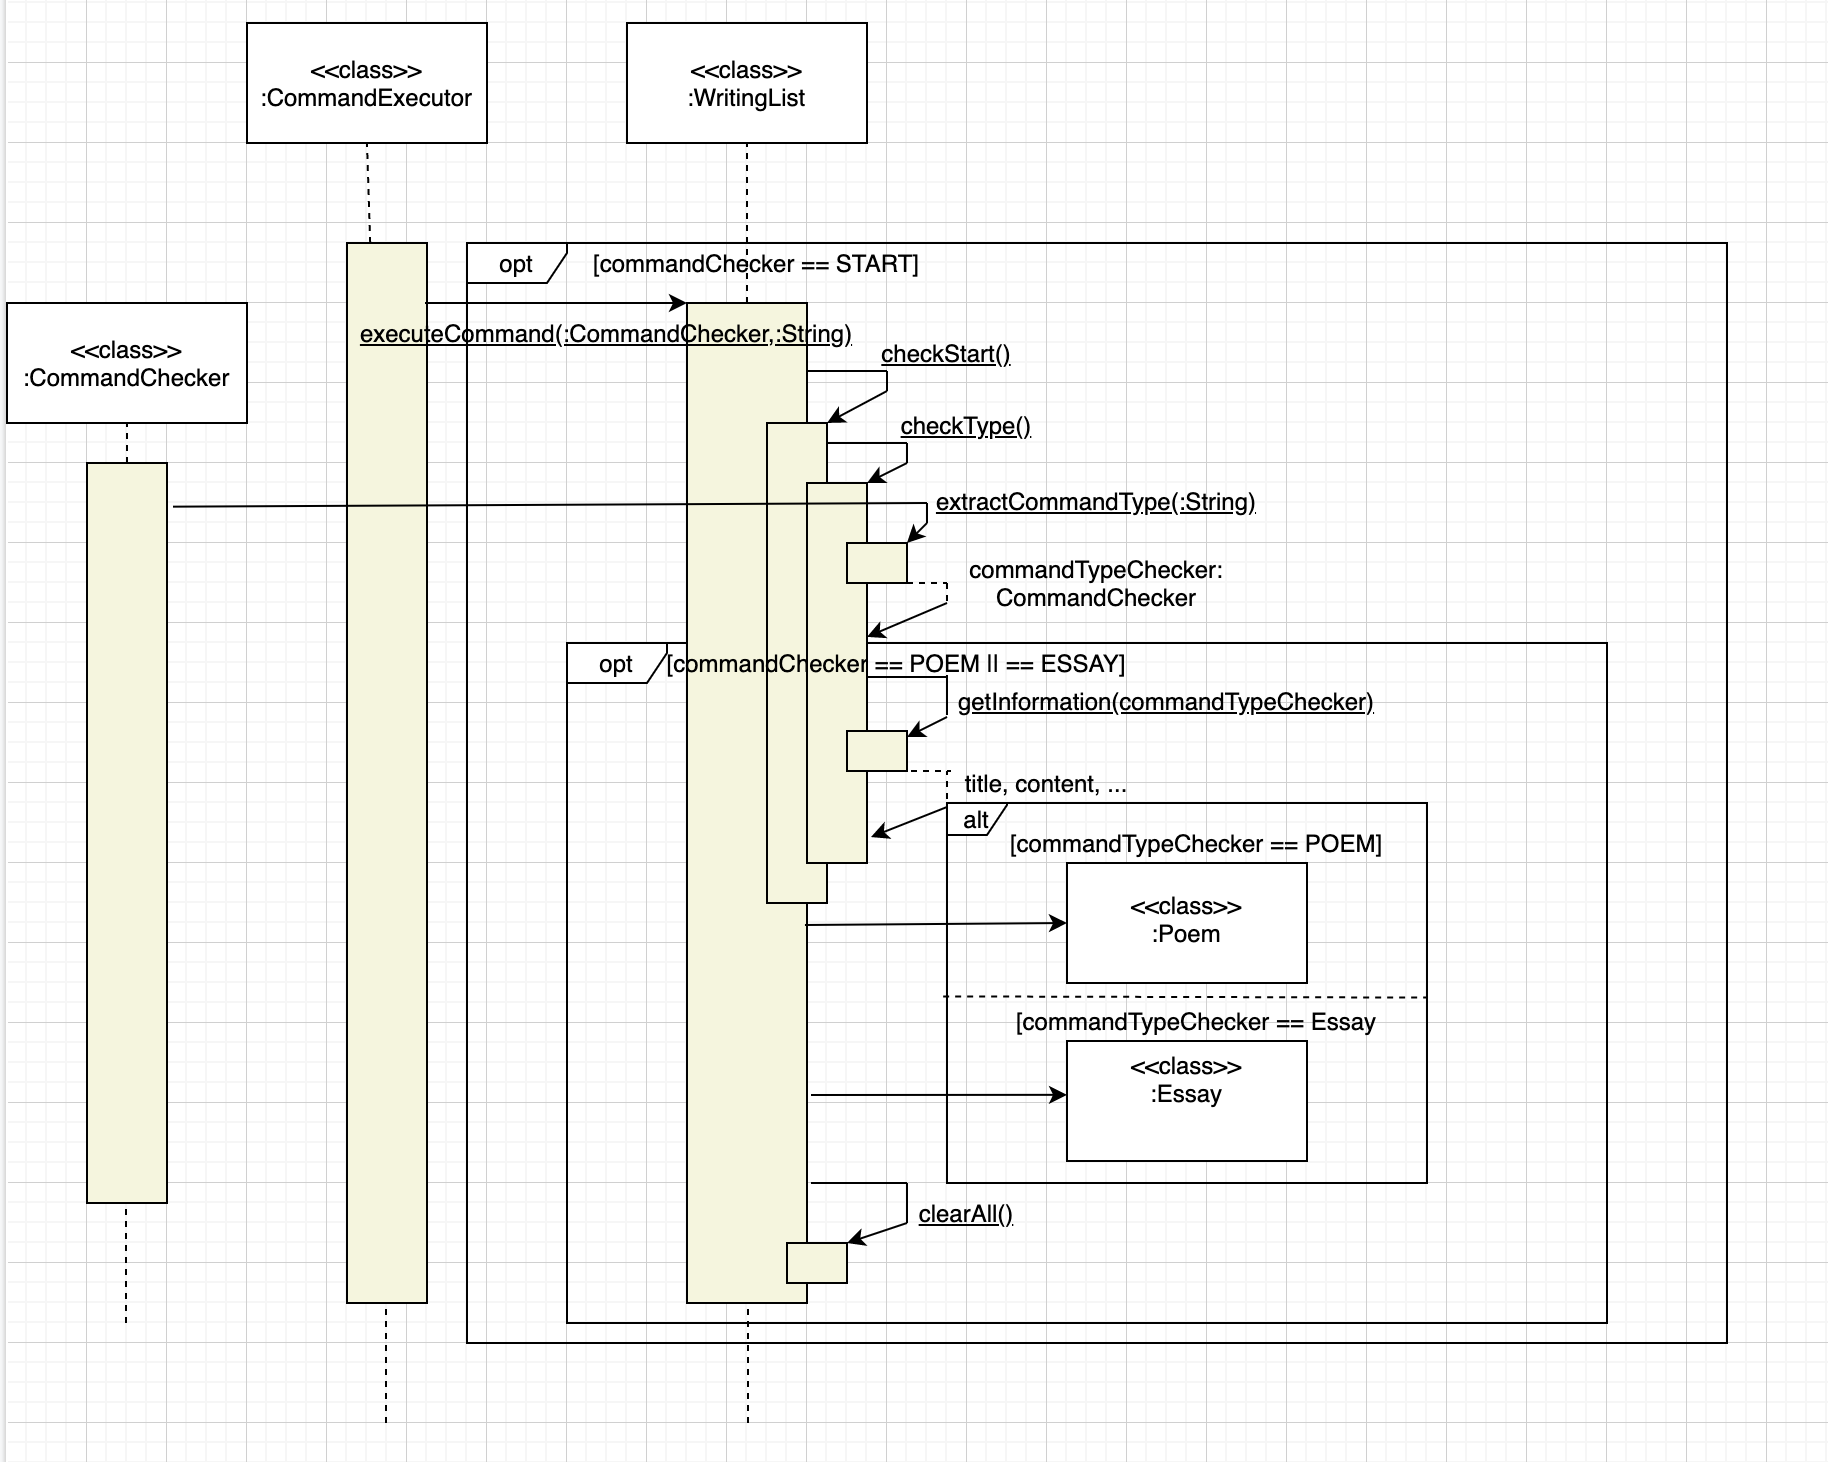
Figure 7: General interactions between member classes when generating a new writing
Implementation
- The above sequence diagram illustrate the process of adding a new writing to the database of the application.
- In this case, the database is created under the form of an ArrayList of Writings Objects.
- At the beginning, the user can start the process by typing
startinto the terminal. - After that, the app will repeatededly asking the using typing in
typefor entering type decision mode.- During this mode, the user will only have options between
poemandessayto choose before entering the main writing’s attribute. - After that, the user’ll go to the stage of inputing the details of the writings such as
topic,content,reminder date. - The name of
authorattribute is taken by the name that the user registered at the beginning of the session.
The main purpose of this approach is not to make the process of configuring the modes more complicated but to prevent careless typos that usually occur while flags are used to indicate too many attributes.
- During this mode, the user will only have options between
Getting reminder for writings scheduled on a specific date
This feature allows users to be reminded of which writings they should continue on a specific date.
Implementation
When the user keys in the command remind DATE, where DATE is the date the user wants to be reminded about in form of dd/MM/yyyy, the program will check the validity of the command by using CommandChecker.extractCommandType(). Since the command is recognized, enumeration REMIND is returned. Then, the program flow is as follows:
WritingReminder.filterWritingsOnADate()is called byCommandExecutor.executeCommand().- In
WritingReminder.filterWritingsOnADate(), theDATEwill be parsed byLocalDate.parse(). - The Java stream is used to filter the list of writings and get which ones are scheduled for that
DATE. - Private
WritingReminder.printWritingsOnADate()will be called to print out the result.
Word Features
Fluffle contains a word bank that stores words which are keyed in by the user, together with its meaning. The diagram below shows the implementation of the words, as well as the word list classes in the program.
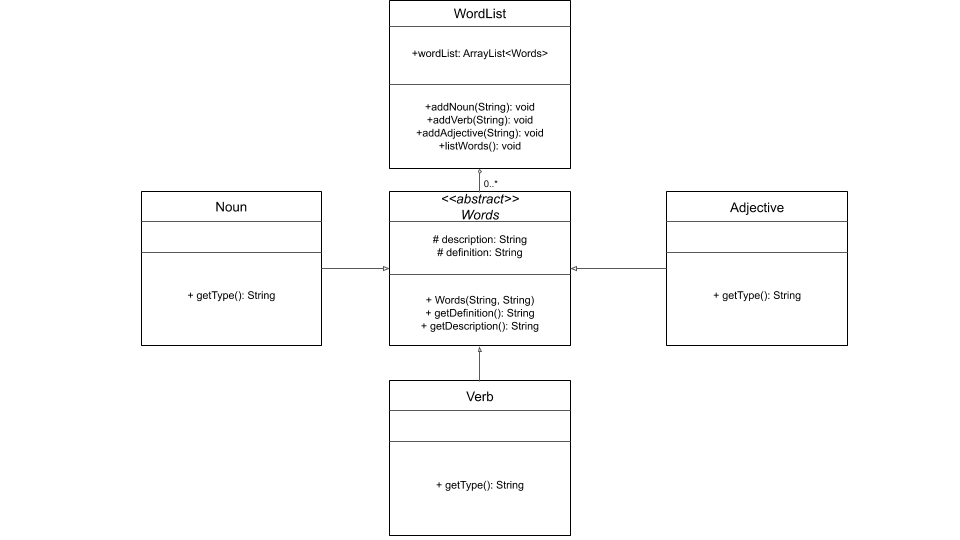
Figure 8: Words UML Class Diagram
WordsList is an ArrayList which stores the objects of Words class. Each object has the following attributes:
Description: the word itselfDefinition: the definition of the word- Getters of the description and definition of the object.
Each Words object is further classified into Noun, Verb, or Adjective class, which have a getter for its type that
identifies whether it is a noun, verb, or adjective.
Adding a noun
This feature allows users to add a Noun into the word bank of Fluffle. When the user adds a noun using the noun command,
an object of the Noun class is created and added into the ArrayList WordList.
Adding a verb
This feature allows users to add a Verb into the word bank of Fluffle. When the user adds a verb using the verb command,
an object of the Verb class is created and added into the ArrayList WordList.
Adding an adjective
This feature allows users to add an Adjective into the word bank of Fluffle. When the user adds an adjective using the adj command,
an object of the Adj class is created and added into the ArrayList WordList.
Listing words
This feature allows users to list all the words that are currently stored in Fluffle.
Generating three random words
This feature generates three random words for the user.
Filtering words
This feature allows users to getting words as they wish. The diagram below shows the overall architecture of filter words functionality.
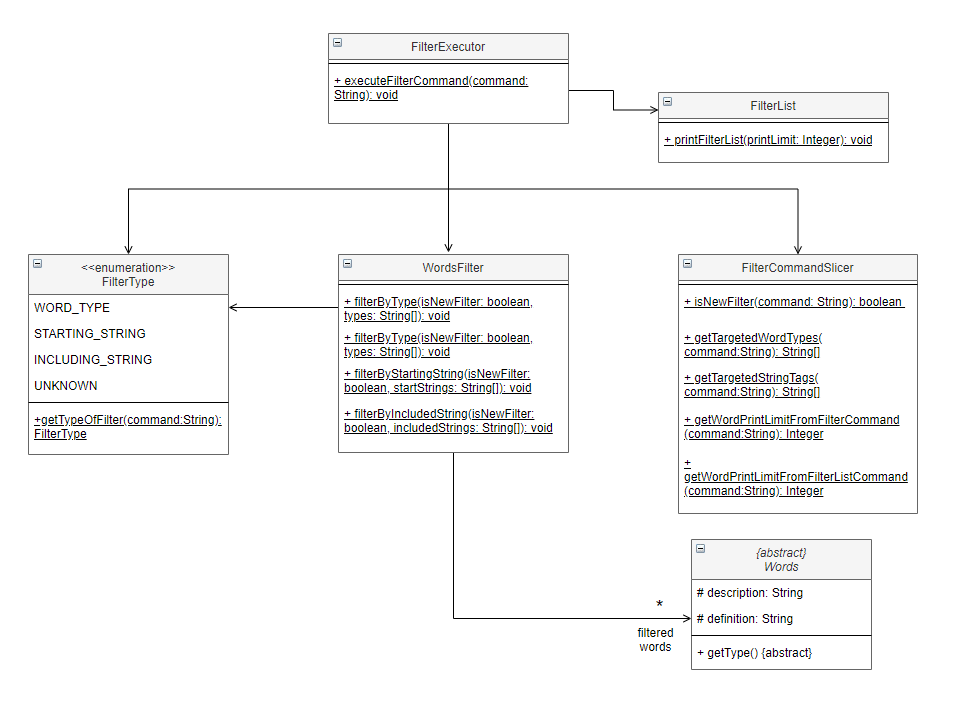
Figure 9: Filter word UML Class Diagram
Implementation
When the user enters a filter words command, the program will check the validity of the command by using CommandChecker.extractCommandType(). Since the command is recognized, FILTER_WORDS will be returned. Then, the program flow is as follows:
FilterExecutor.executeFilterCommand()will be called byCommandExecutor.executeCommand()`.- In
FilterExecutor.executeFilterCommand()method, the program will:- Call
FilterType.getTypeOfFilter()to get the filter type enumeration (WORD_TYPE,STARTING_STRINGorINCLUDING_STRING). - Call
FilterCommandSlicer.isNewFilter()to determine whether the user wants to continue on the last filtered list or start a new filter on an entire word list. - Check whether the user has entered a print limit using
FilterCommandSlicer.getWordPrintLimitFromFilterCommand(). - Depending on the filter type,
FilterCommandSlicer.getTargetedWordTypes()orFilterCommandSlicer.getTargetedStringTags()will be called to get an array of strings containing the word types or strings required for the filter process. - The array of strings will be passed to either one of the three methods
WordsFilter.filterByType(),WordsFilter.filterByStartingString()orWordsFilter.filterByIncludedString()to process the filtering. - Call
FilterList.printFilterList()to print out the result.
- Call
The following sequence diagram shows how the components interact with each other for the scenario where the user issues the command filter -continue by\start limit\10 -cs -cg.
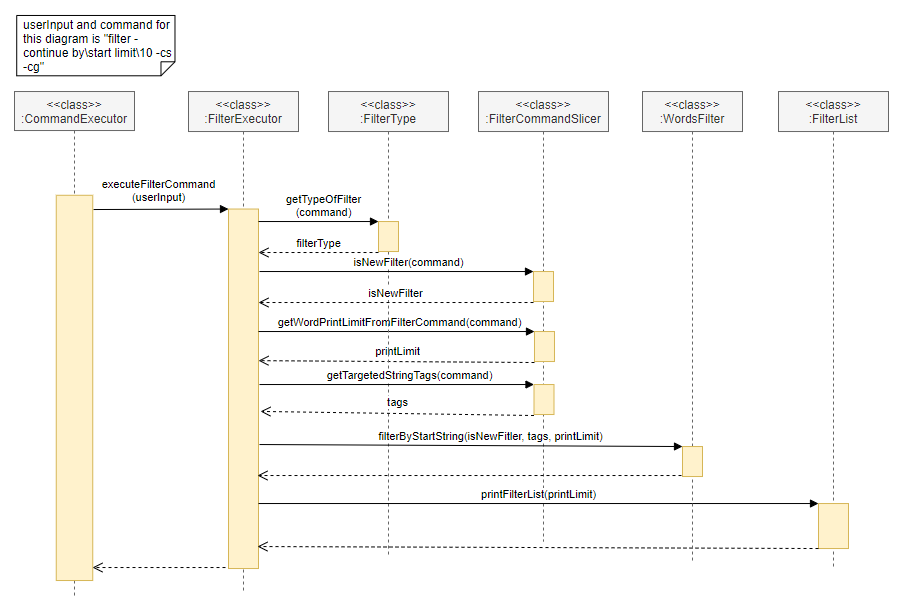
Figure 10: Interactions between components for the command filter -continue by\start limit\10 -cs -cg
In Figure 10 above, the flow of the program after it enters the filter process is as follows:
- The
CommandExecutorcallsFilterExecutor.executeFilterCommand(). - In the method
executeFilterCommand,FilterType.getTypeOfFilter()is called to get the filter mode, which isSTART. - Then,
FilterCommandSlicer.isNewFilter(),FilterCommandSlicer.getWordPrintLimitFromFilterCommand(),FilterCommandSlicer.getTargetedStringTags()is called to check whether the program should continue on the last filter list and to get print limit as well as the strings used for filtering.- The returned result of
FilterCommandSlicer.isNewFilter()istrue. - The returned result of
FilterCommandSlicer.getWordPrintLimitFromFilterCommand()is an integer10. - The returned result of
FilterCommandSlicer.getTargetedStringTags()is the array["cs", "cg"]
- The returned result of
- Since the filter type is
START, the methodWordsFilter.filterByStartString()class is called to execute the main filter process. - Filter list is printed by calling
FilterList.printFilterList(). - The filter process terminates.
Bunny class family overivew
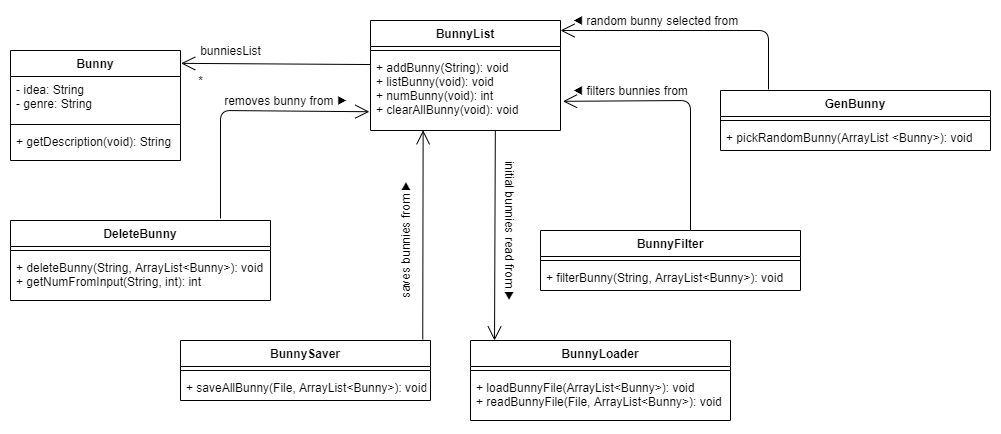
Figure 11: Bunny ideas UML Class Diagram
The above class diagram describes the overall architecture of the bunny list functionalities. Recall that the term bunny refers to plot ideas that have yet to be devloped. The above classes provide the functionality of storing such ideas in an organised manner that can easily be searched, saved and loaded.
BunnyList, BunnyFilter, and DeleteBunny class overview
The BunnyList class has the public ArrayList of bunnies bunniesList that is accessed by the DeleteBunny class method deleteBunny which removes a selected bunny from the bunniesList ArrayList. Similarly, bunniesList is also accessed by the BunnyFilter class which contains the filterBunny function which can filter through the list and obtain bunnies with specified keywords in the idea or the genre using the command filter bunny i\IDEA g\GENRE, where the user may choose to omit either the IDEA or the GENRE when running the command.
BunnySaver and BunnyLoader class overview
The BunnySaver class accesses the bunniesList and overwrites the current bunny.txt file in the data directory, saving all Bunny objects into the file using the saveAllBunny method. Bunny objects saved in that file can then be read by the BunnyLoader class and added into the bunniesList ArrayList each time the program is started up, which is done by calling the loadBunnyFile method.
GenBunny class overview
The GenBunny class can access the bunniesList as well. The function pickRandomBunny from the GenBunny class first randomly generates an integer between 0 and the max number of Bunny idea in the bunniesList ArrayList. It then selects that indexed Bunny from the bunniesList and returns it to the user. This allows the user to easily choose an idea to start working on without struggling to decide which idea to use.
Bunny command implementations
Adding bunny idea bunny
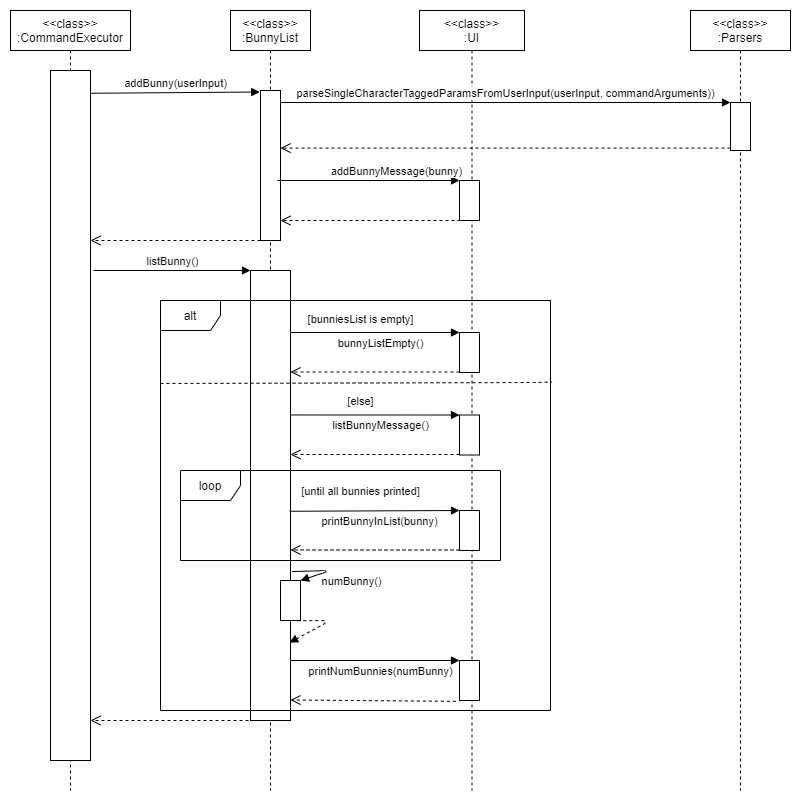
Figure 12: Bunny list UML Sequence Diagram
The user may call upon the bunny command to add bunnies to the list. The user input is first processed by the extractCommandType method from the CommandChecker class, and the command type detected is sent to the executeCommand method from the CommandExecutor class. The addBunny function is called by this method accordingly. The addBunny command calls the parseSingleCharacterTaggedParamsFromUserInput method from the Parsers class to extract the idea and genre arguments from the command. These are then used to create a new Bunny object that is then added to the bunniesList ArrayList. The addBunnyMessage method from UI is then called to print the message that the Bunny idea object has been sucessfully added to the ArrayList.
Listing bunny ideas list bunny
This command works similar to how the saveAllBunny command in the BunnySaver class works. The function called by the executeCommand method is the listBunny command of the BunnyList class. It iterates through the bunniesList and passes each one to the UI class method printBunnyInList. Once all the Bunny objects in the list are printed, it concludes by printing the number of Bunny objects found in the list so the user can easily tell how many bunny ideas they have left.
Filtering bunny ideas: filter bunny
The filter bunny command is implemented by the executeCommand method passing both the userinput String and the bunniesList ArrayList to the filterBunny method in the BunnyFilter class. It first checks that the userinput has the required arguments using the parseSingleCharacterTaggedParamsFromUserInput method to extract the arguments. It then uses streams to filter for the specified keywords in the idea component or the genre component of the Bunny and prints the filtered items using the printFilteredBunny from the UI class.
Saving bunny ideas: save bunny
When the save bunny command is detected by the commandChecker method of the CommandChecker class, it saves the Bunny objects from the bunniesList to the bunny.txt file as mentioned above.
Deleting a bunny idea: delete bunny
To delete a bunny from the list of bunny, the deleteBunny method of the DeleteBunny class first parses the given user input string to determine the index of the Bunny the user wants to remove from the bunniesList ArrayList, then it simply uses the remove method on the ArrayList to remove the specified Bunny object.
Generating a random bunny idea: random bunny
The random bunny command uses the pickRandomBunny method of the GenBunny class uses Random and the current time to generate a random number, the modulus is used to select the index of the Bunny from the bunniesList. The method bunnyRandomlySelected from the UI class handles the retrival and printing of the selected Bunny.
Resetting the entire list of Bunny ideas: reset bunny
The reset bunny command simply calls clearAllBunny function to clear the bunniesList in the current run of the program. To save the cleared list the function simply reminds the user that they should use the save bunny command mentioned above.
Names class family
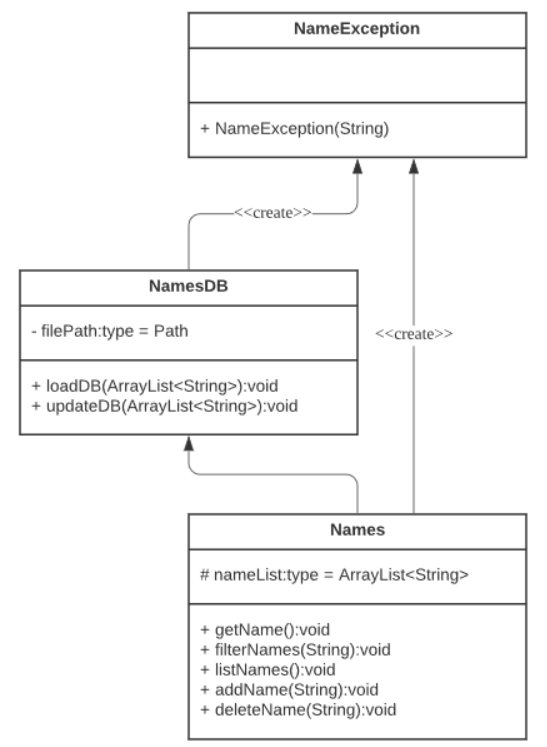
Figure 13: Names UML Class Diagram
Overview of main function
The above class diagram (Figure 13) describes the overall architecture of the name list functionalities. The Names class has the protected ArrayList of names, nameList, that is accessed by the Names class method getName which randomly gets a selected name from the nameList ArrayList. Similarly, nameList is also accessed by the Names class which contains the filterNames function which can filter through the list and obtain names with specified keywords using the command filter name <NAME>, where the user may choose to omit the NAME when running the command. Similarly, nameList is also accessed by the Names class which contains the listNames function which displays all the names stored in the nameList ArrayList. This is the same as the filterNames function when given no input String. Similarly, nameList is also accessed by the Names class which contains the addName function which adds a name to the list of names stored in the nameList ArrayList using the command add name <NAME>. The NAME cannot be omitted. Similarly, nameList is also accessed by the Names class which contains the deleteName function which removes a name from the list of names stored in the nameList ArrayList. The command to do this is delete name <INDEX>. The INDEX cannot be omitted, and the range of the INDEX can be determined from the listNames function above.
Names Storage
The NamesDB class accesses the nameList and overwrites the current Names.txt file in the data directory, saving all String objects in nameList into the file using the updateDB method. String objects saved in that file can then be read by the NamesDB class and saved into the nameList ArrayList using the loadDB method. In the event of the database Names.txt not existing, the NamesDB class will create the Names.txt database and populate the database with 500 names using the loadDB method.
Names Exception Handling
As shown in Figure 13, both the NamesDB class and the Names class will create the NameException class. This is a subclass that inherits from the Exception superclass and passes the exception message to the superclass. In the event of an exception, it is thrown from the methods in NamesDB class and Names class and handled by the NameException class.
Names method implementation
getName method
Loads the database first so we are working with the latest version of the database. Generates a random number within a range and using that number, we can use it as an index and get a random name from nameList. Exceptions are also handled properly.
filterNames method
Loads the database first so we are working with the latest version of the database. Uses filtering to get the list of names matching the String provided. Returns a collection from the filteredNames and checks if any names were matched during the filter. If none, then outputs none and if any are found, all are printed. Exceptions are handled properly using the NameException class.
listNames method
Loads the database first so we are working with the latest version of the database. Prints the list of names found in the updated nameList. Checks if there are no names stored in nameList and prints an appropriate message.
addName method
Loads the database first so we are working with the latest version of the database. Strips the given name of all extra white spaces and adds it the ArrayList of names named nameList. nameList is then passed to NamesDB’s method called updateDB. updateDB will then update the text file stored locally named Names.txt. Outputs the success of adding a name if successful and throws Exception to NameException if invalid.
deleteName method
Loads the database first so we are working with the latest version of the database. Using the index received, parse the index accordingly. Will handle exceptions in the case the index is not valid. The index will be used to remove the name entry at that index minus one in the nameList ArrayList. The updated nameList is then passed to the NamesDB’s method called updateDB. updateDB will then update the text file stored locally named Names.txt. Outputs the success of deleting a name if successful and throws Exception to NameException if invalid.
ClearLoader class
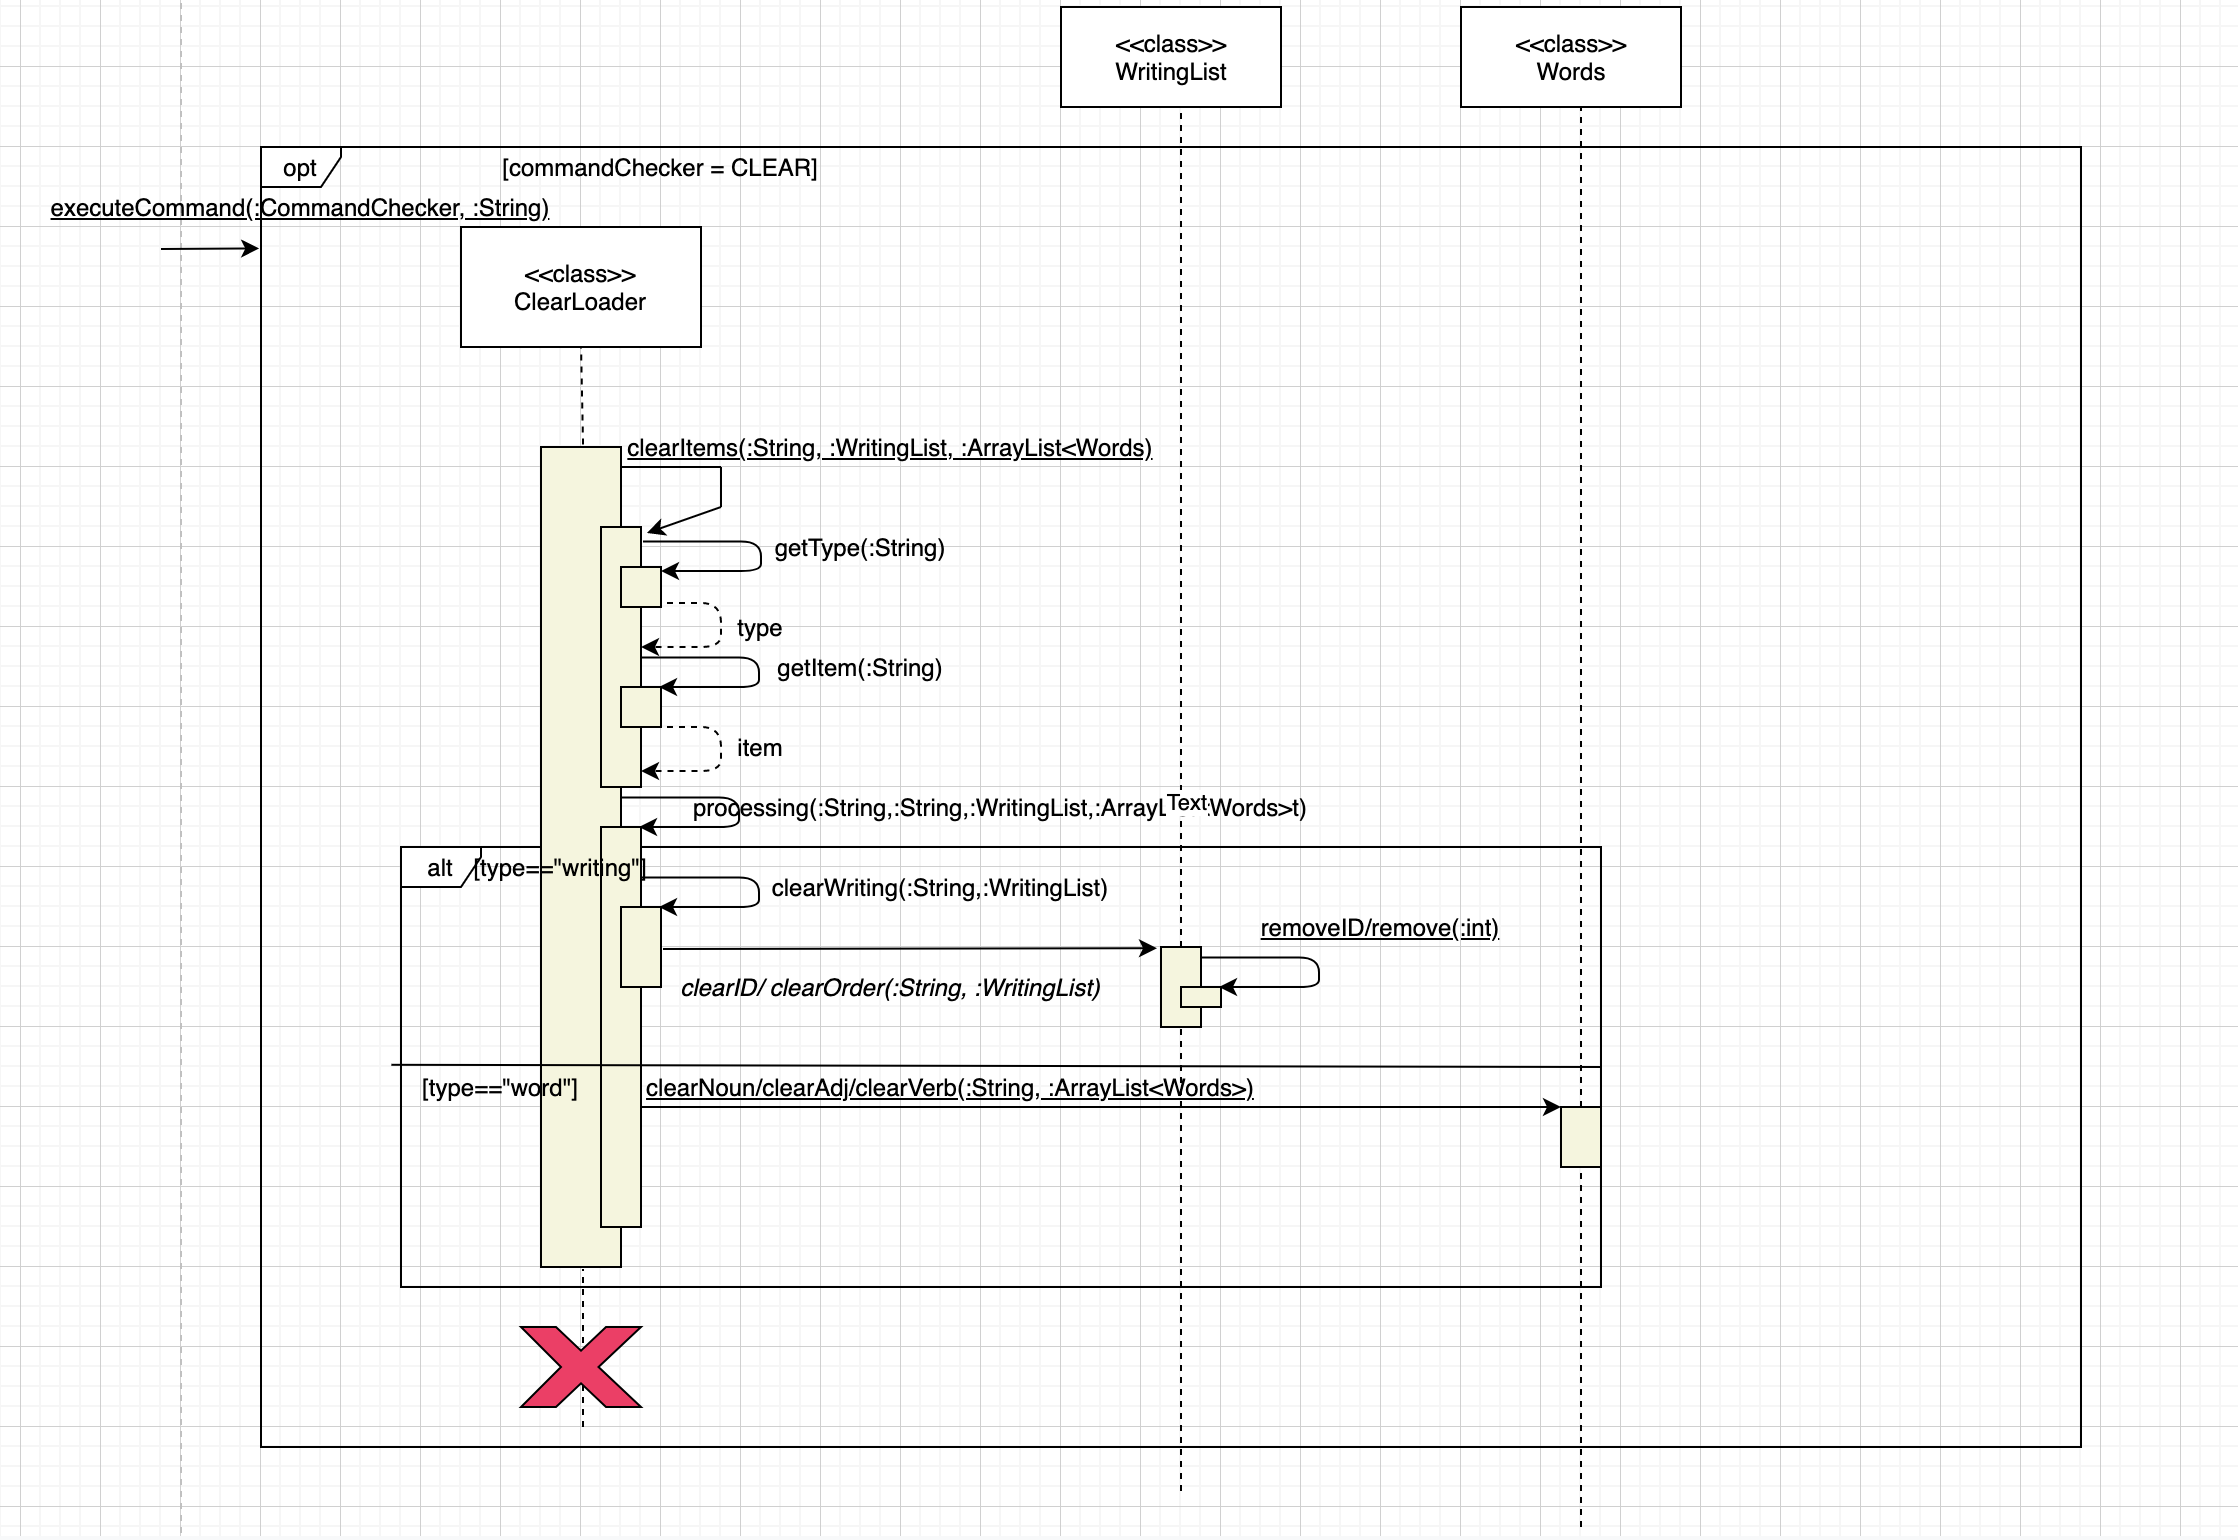
Figure 14: Sequence diagram of Clear Loader while operating the removing method for the app's writings and words
Implementation
- The above diagram illustare the mechanism of manipulating objects stored in the database by adding the ability of
clearcertain unwanted subjects from the database - The main targets of the clearing procedure are the writings and words stored in the database as array listes
- The process begins when commandChecker detects the command
clearenter by the users - If the syntax is corrected in the form of
clear type\<TYPE_OF_OBJECT> item\<FLAG (Optional)><OBJECT_INDICATOR>, the process begin- If the
<TYPE_OF_OBJECT>chosen by the user iswriting, the machine is now going to consider the<FLAG>- If there is no flag, it is detected as the order of the writings stored in the database, the process is going to clear the writings with such order stated by
<OBJECT_INDICATOR>1.If the flag is-id, the machine is going the clear the writing with respectiveidfrom the database - Otherwise, the command is considered as invalid (mostly in case
<OBJECT_INDICATOR>is not an integer or leads to out of bound objects
- If there is no flag, it is detected as the order of the writings stored in the database, the process is going to clear the writings with such order stated by
- If the
<TYPE_OF_OBJECT>chosen by the user isword, the machine is now goin to consider the<FLAG>. There are 3 cases of flags available for this mode<FLAG>is detected as-noun: Remove the corresponding item labelled by the followed<OBJECT_INDICATOR><FLAG>is detected as-adj: Remove the corresponding item labelled by the followed<OBJECT_INDICATOR><FLAG>is detected as-verb: Remove the corresponding item labelled by the followed<OBJECT_INDICATOR>- Otherwise, it is considered as invalid command if the
wordwith respectivetypedoes not exist in the database.
- If the
Aesthetic components
Changing line divider in Fluffle: divider
The line divider is saved as a static string in the UI class. When the divider command is detected, the changeLineDivider method from the UI class is called to parse the selected line divider option and the getDivider method retrives the new divider String from the Logos class and saves it as the new currentLineDivider String in the UI.
Testing
If you are using IntelliJ IDEA with Gradle, there are two ways to run tests for Fluffle.
Using JUnit test
- To run all test, in IntelliJ, right click on
test/java/seedu.dukeand chooseRun Tests in 'seedu.duke' - To run test on a separate package/class/method, right click on that package/class/method in
testdirectory and chooseRun 'NAME'.
Using Gradle
- To run all test, open the terminal in IntelliJ IDEA, move to the root folder of the project and key in
gradlew clean testfor Windows (./gradlew clean testfor Mac OS/Linux).
Appendices
Appendix A: Product scope
Target user profile
The target user group are creative writers.
- Writers who enjoy digitally typing up their works and thus can integrate using our CLI based app into their workflow.
- Writers who enjoy creating short pieces but lack the organisation to do so.
- Writers who want to improve their creative writing skills and need a proper way to achieve it.
Appendix B: Value proposition
The application aims to provide the writer with the following services:
- Provide them with an organised way to store and select their plot ideas which may be otherwise abandoned
- Provide them with customised prompt suggestions to inspire them to write
- Provide them with a system to organise longer writing projects in a neat and logical manner to facilitate the writing of long works
Appendix C: User Stories
| Version | As a … | I want to … | So that I can … |
|---|---|---|---|
| v1.0 | new user | see usage instructions | refer to them when I forget how to use the application |
| v1.0 | user | I would like the app to have a word list | keep my list of favorite words and refer to them in my writings |
| v1.0 | writer | choose the name of the character generated from the database | write without thinking a lot about my character’s name |
| v1.0 | writer | clear and edit the saved writings in my storage | easily change them later on |
| v1.0 | writer | generate words from my word list based on word type or some substrings | find the ideas to continue my writings |
| v1.0 | writer | continue to filter on my last filter list | narrow down the words I want to use |
| v1.0 | writer with a lot of fleeting ideas | a place I can temporarily store all my short ideas | find them easily when I need them |
| v2.0 | user | check my spelling automatically | don’t spell wrongly |
| v2.0 | writer | have an app that list all the statistics from my past writings | |
| v2.0 | user | get the inspiration from the app | improve my creative writing skills |
| v2.0 | user | have a database of my writings | refer to them in the future |
| v2.0 | writer who uses the filter function in v1.0 | limit the filter words printed out on the screen | view them easily if the filter list has a lot of words |
| v2.0 | writer who is bad at sticking to an upload schedule | be reminded by the app which pieces I need to work on next | continue to hold my writing spirit |
| v2.0 | writer who frequently uses the app | save the words to local storage and load them when I start the app | save more words than usual |
| v2.0 | writer facing writers block | generate a random idea from my bunny storage | warm up or brainstorms on my writings |
| v2.0 | writer facing writers block | have an app that randomly generate the words | brainstorm for my writings based on those words |
Appendix D: Non-Functional Requirements
- Should be a Command-line Interface application.
- Should work on any common Operating System (Windows, Linux or OS-X platform) as long as Java 11 is installed in the system.
- Should be user-friendly to new and expert creative writers with average typing speed.
- Should help creative writers do their tasks faster by commands rather than any other programs that uses mouses and other pointing devices.
- Should display characters in ISO basic Latin alphabet and basic numbers correctly.
- Should have local storage of editable text files (.txt).
- Should work without requiring an installer.
- Should work for single user.
- Should work without Internet connection.
Appendix E: Instructions for manual testing
Given below are the instructions to test Fluffle manually.
Launch and Shutdown
Following are the instructions to launch and shutdown Fluffle
- Verify that you have
Java11or above version installed by typingjava --versionto your computer’s terminal (Command Prompt for Windows, Terminal for MacOS) - Get the lastest version of Fluffle from here.
- Copy the file to the folder you want to use as the home folder for Fluffle.
- Type in the terminal
java -jar duke.jarand press Enter. If the setup is correct, you should see something like below:-------------------------------------------------------------- Write a story with ______ _ __ __ _ | ____| | / _|/ _| | | |__ | |_ _| |_| |_| | ___ | __| | | | | | _| _| |/ _ \ | | | | |_| | | | | | | __/ |_| |_|\__,_|_| |_| |_|\___| -------------------------------------------------------------- Hello User! Welcome to Fluffle! What can I do for you? -------------------------------------------------------------- What is your name? - After entering your name, try typing the
helpcommand and press Enter to get started. - Some example commands you can try:
noun computer d\ a smart machine: to add a noun to your word list.list word: to view your word list.
- If you want to shutdown Fluffle, use the command
exit.
For a more specific explanation and demonstration of the commands, visit our User Guide here.